NOTE FROM BILL H. REGARDING THIS TSB (3/15/24)
I have a 1999 Pace Arrow 7x,xxx miles. I had a crank no start issue. Contacted a mobile mechanic and after two fuel pumps (nothing wrong with either) or a list of numerous parts. I decided to require that your TSB that you identified be installed if it wasn’t installed by previous owner. Worked immediately it was an open ground issue! Thank you so much for the help. We were without our MH for about four months and several parts and $$$$.
Thanks Again.
NOTE FROM KEVIN D. REGARDING THIS TSB:
I have a 99 F53 6.8 that had no injector pulse, no coil pulse, no CEL light, no obd II port functions, and my MAF had low readings as well.… Pin #51 of this TSB supplies grounds to the ECM relay, fuel pump relay, the CEL light, and the OBD II Port.. I performed the TSB today and it fired right up, after sitting dead over a year. Obviously this TSB can fix a LOT MORE than shifting Issues.
In the past four weeks I’ve heard from several owners of 1999 F53 chassis who’ve complained about this weird shifting. I called their attention to a Technical Service Bulletin (TSB) issued by Ford back in the year 2000. When they performed the ground modifications described in the TSB, it solved their problem.
We’ve only owned our “New-to-Us” Southwind for a couple months and haven’t driven a lot yet. I haven’t noticed any unusual shifting during the short time we’ve owned it. When I inspected the wiring, I discovered the TSB has not been complied with, so to make sure I don’t have any problems in the future, I decided to do the TSB.
The procedure is reasonably simple, but the only problem is, the special harness that’s called out in the TSB isn’t available anymore. Read the TSB Ford Article # 02-11-3 (READ HERE)
On my F53, the Power Control Module (PCM) is in the drivers compartment and sits just above the floor directly in front of the brake pedal. Because of its location, this could be a challenge for many motor home owners. My Southwind has a drivers door, so it was easy. If you don’t have a drivers door, you’ll need to do a pretzel imitation or remove the drivers seat to make access easier..
I disconnected the chassis and coach batteries, and unplugged the Southwind from shore power to make sure there was no power applied anywhere to the motorhome while I had the wire harnesses exposed.
Generally, I followed the process as described in the TSB. (READ HERE)
NOTES
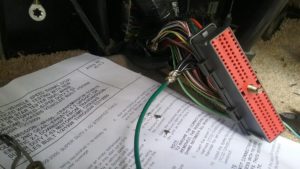
The TSB has you push the old pins and wires out of the PCM plug, then insert 7 new pins and wires from the new TSB wire harness at the same locations. I wasn’t able to buy a TSB wire harness so I decided to reuse the existing wires and pins so didn’t push them out.
RE-USE THE EXISTING PINS
I carefully cut open the wire harness, and located the 7 wires called out in the TSB. I traced the wires back into the bundle and cut them about 4 inches back from the pins. These wires are Black with white strips, there are 7 of them. When you trace these wire back into the bundle, about 6 inches into the harness they go into a common splice where all 7 wires tie together.. I decided NOT to re-use the existing splice. Instead, I made a new splice with the seven wire and also added my new ground wire to this splice. My new wire was a green colored 1 ft long piece of #12 stranded wire. I soldered the 7 black wires and my green wire together to form the new splice. On the other end of my green wire I crimped and soldered a 1/4 inch round lug terminal.. This lug terminal will go to the ground connection.
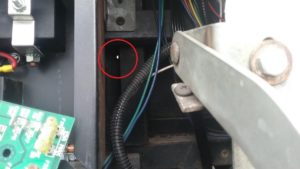
FIND LOCATION FOR NEW GROUND HOLE
Do NOT use the existing hole for the new ground, follow the TSB. The TSB requires a new ground hole be drilled in the firewall metal. There’s a lot of wires and other stuff where the new hole needs to be drilled.
To find a good location for the new hole, I removed the existing bolt that holds the two ground lugs. When I looked from the front of the firewall (under the hood) I could see light where the ground hole bolt was installed. I then judged where I would need to drill the new hole. In the drivers compartment, I drilled the new hole just below and slightly inboard of the existing hole. This gave me good access to the new bolt and I didn’t hit anything when drilling..
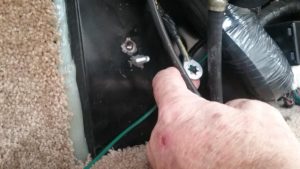
Need bare metal for good connection. After drilling the new hole, I used a Dremel grinder tool to grind off the paint from around the new hole. I also cleaned up the old hole so as to get a good ground connection.
The TSB has you move the wires that were under the original hole to the new hole. Then install the new ground lug on the original ground hole. From the front side of the firewall, I inserted a 1/4×20 bolt in the new hole and held it there with a vise grip. On the drivers side, I installed the two original ground wires on the bolt and then installed and tightened the nut..
I then installed my new green TSB ground wire on the original ground lug hole and tightened the bolt.
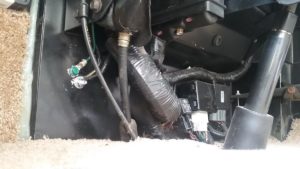 The finished TSB reassembled and tested. (READ HERE)
what is the existing green ground for ?
I assume you’re asking about the wires under the ground screws. I don’t know where the two original wires came from. The “green” wire is mine. It connects to the seven wires on the ECM connector.
This guide was amazing, thank you for this. I do not have a door on mine so my body is now a pretzel.
Excellent post. Wish I had the info 2 decades ago. We had/have what sounds exactly like this problem way back in the very early 2000s after only a couple years owning out 1999 34V Ford. Vehicle takes off after long hot drive in 2nd. Trans guy said computer telling trans to start off in incorrect gear. Was correct on diagnosis but not solution, which we didn’t do. I think this was before TSB was issued. Anyways, cut to the chase here. So the 7 black/white stripe wires are essentially grounds and you just moved them to a separate ground correct? That’s it essentially? Thx
Yes. Basically thats it.. Provide a new ground point and re-do the splice where all the grounds connect together.
The original ground is still put back in the original ground hole based on your picture, correct? I assume you just leave the other cut ends of the black/white stripes unused and buried in the re-taped loom. So the short version of their diagnosis is, there is some kind of “feedback” from other parts of the electrical system affecting the signal telling the transmission which gear it should be in and by moving the ground “outs distance” away from this “feedback.” Is this about it? Hope it works. Guess you don’t really know since you said you never incurred the problem before you corrected it. Hope this works. Thanks again.
what isn’t in this article is that if you take wire from pin 51 that your rig will not start, because that grounds the fuel pump circuit .
Pin 51 is one of the ground. So what are you saying to do with Pin 51?
He is moving the grounds to a new separate ground because of the “feedback” that is causing the problem.
This fix works! I’ve had a 99 Pace Arrow since 05 have always had to manually shift up to drive which has been very frustrating, was told by one transmission shop that the valve body was the cause and another that it had a bad PCM…never really wanted top spend the $ for either. A year or so ago had the trans rebuilt…no difference and now I was about to order a computer and stumbled on to this post. About an hour and a half following the procedure and after 17 years of owning this coach it it fixed. Thank you
That’s great! I just did the same about 2 months ago. Mine was very intermittent and only after a very long drive. Has a rans guy look at it back around 2001. I have a 99. He did not find a service bulletin back then. I think it came out afterwards. I have only done one long drive since I repaired it and no problems. Hoping it fixed it for good. Not a difficult procedure but extremely difficult to get under the dash if you do not have a front door. I did not. I removed the front drivers seat and pedastal and it was much easier. Mark the front of it before you remove it.
I just found your site and I am in LOVE with how you’ve documented everything you’ve done! I have a 1999 Georgie Boy built on the same model of chassis and have just performed this TSB that you documented so well here. I can’t wait to see if that transmission shift problem disappears on my next trip from Fair Play, SC to Dunlap, TN!
I just wanted to add a word of caution for other would be followers of this walkthrough. When you follow the instructions, follow them as they are written. I did not! I wound up cutting the ground wires BELOW the splice not above! Apparently, that splice is responsible for creating ground for the MAF circuit! I connected ForScan to my ODB and immediately noticed that my MAF voltage had a 0v reference and the sensor read 1.1 g/s. To remedy, I went back into the harness, found the three ground wires I had electrically disconnected and soldered them back together. MAF is back!
Thanks so much for all your efforts! I’ve earmarked more of your walkthroughs for my eventual PMs…
Regards,
-Kyle
I tried everything else for the OSS (output speed sensor) issue (blinking overdrive off, P0720 / OSS circuit issue on OBD reader), and then thank goodness found this, because I never would have gotten this fixed otherwise. Re-grounded these 7 wires like you, similar to what was in the bulletin, and sure enough everything is happy again!! Thank you VERY much for posting this!
2000 Georgie Boy Landau
Thank you. If you’re on any social media or RV forums, Please post a good comment about this. Tnks, John
Yep. Ditto here. Lived with this issue for 20+years and fixed it about 4-5 months with this fix. No issues since. I didn’t have a drivers door so it was a bit harder to get to, but manageable.
I have a 1999 Pace Arrow 7x,xxx miles. I had a crank no start issue. Contacted a mobile mechanic and after two fuel pumps (nothing wrong with either) or a list of numerous parts. I decided to require that your TSB that you identified be installed if it wasn’t installed by previous owner. Worked immediately it was an open ground issue! Thank you so much for the help. We were without our MH for about four months and several parts and $$$$.
Thanks Again.
Hello there I have the exact same motor home. I have owned it for 10 years I have been having this problem since i have had. With this fix it is finally a pleasure to drive, And shifts smooth.
Also change out the generator transfer switch with the help of this website Thank You for posting this
I have a 99 F53 6.8 that HAD no injector pulse, no coil pulse, no cel light at all, no obd II port functions, and my MAF had a low reading as well.
Anyhow, as Mentioned Pin #51 grounds The ECM Relay, Fuel Pump Relay, and Obviously the CEL light, and OBD II Port, I performed the TSB Today and it fired right up, after sitting dead over a year.
That TSB needs updated, Obviously it has to do with ALOT MORE than shifting Issues.
This TSB really needs Updated, IT DID fix my Issue on my 99 F53 6.8, which was NO ECM Ground which in turn I had No Injector Pulse, No Coil Pulse, My MAF reading was Low, and My CEL / MIL Light wasn’t working, along with my OBD II Port.
As already Mentioned Pin #51 is The Ground for The ECM & Fuel Pump Relay, so this TSB is for MUCH MORE than for Erratic Shifting. But it DID FIX my Issue, so glad I found this, along with the Additional info on Pin #51.
And looking at the Wiring Diagram, I can see where the Ground Issue was Causing the Low MAF reading, No CEL / MIL Light, and OBD II Port being Dead as they ALL NEED GROUNDS to Function properly.
~ Kevin ~
Thank you. I added a note at the beginning of the article to reflect this.
Awesome, thanks so much
That’s Awesome, and thanks alot !!!
Finding this Article has took a HEAVY LOAD off of me, as this thing has sit Dead for over a Year, and I was at my Wits End with it, it’s so Bizzare that finding a Transmission TSB fixed my Issue.
At 1st I was hesitant to try it, but after seeing Vincent’s comment about Pin #51 that Gave me some hope that this could possibly work, and sure enough it Did !!!
Reading the wiring Diagrams is Very Confusing and it leads you to a Ground Bundle on the LR of Engine Compartment, if you’re thinking about and looking for Grounds, No wiring Diagrams Or ECM pinouts shows this Ground Splice that is in this TSB, Infact it shows a Black with white stripe going to the Shift Range Selector Switch.
Another thing I would suggest, If you’re gun shy about tearing into the harness ” I Was ” MAKE SURE AND CLEAN THE ORIGINAL BOLT GROUND TO BARE METAL, and put some Dielectric Grease on it, and maybe try that 1st for a Starting Issue, mine was NOT BARE METAL, it was Black Paint and had some SLIGHT corrosion on it, so I MIGHT have got away with just CLEANING that Original BOLT HOLE, I wished I would’ve tried it 1st to see.
Anyhow, I went Forward with the TSB, As this thing did always shift Erratic, but I do feel that cleaning the Original mounting hole just might have did the Trick as far as the Starting Issue.
~ Kevin ~
Do you have a wiring diagram I desperately need one for this unit I am having electrical issues with my coach a/c and can’t seem to find out where the relays are and fuses are located thanks to Ford. They don’t give you any kind of markings on the the fuse boxes
There are some simplified diagrams on my other site.
https://waiterecc.com/download/
Look for the simplified diagrams. Send me an email with your phone number and I’ll give you a call.
John Mc
AKA Waiter
Pingback: Transmission overheating on early model V10 powered F53s - 1999 Southwind 35S
Last year, my F53 2000 had a « service engine soon » light on and the Ford dealer couldn’t find the problem, going up to the replacement of the transmission. At that point, I had spent 11000$CA and the damn light was still on. I told the dealer representative to call their tech support after the first visit but they never did that saying Ford tech support wouldn’t reply to them. Bullshit! After the transmission was replaced and the problem came back right after, they decided to call them. The answer arrived the next day with this TSB and it worked right away. This TSB is very important to solve some mystery issues. At the end, it cost me 9000$CA total. I am very disappointed from the dealer service.
The grounding TSB has solved a lot of problems in early F53s. Also, the 1999 and 2000 year model 4R100 did have a major issue, lack of cooling.. This caused a lot of transmission to go bad. It didn’t have the integral tranny cooling in the radiator, so the tranny could easily overheat in warm weather when driving at slow speeds, stop and go traffic.
This TSB is a Life Saver, Infact this entire Site is, if you read my post, then you already know. I still have a MAF Sensor Circuit Issue to chase down yet, but happy to Report the Old Girl made a 6 Hour Trip a Couple weeks Ago, and Fired right Off every time we stopped.
IMO MOST Ford Techs don’t want anything to do with these F53s, and it’s a Dam Shame that Folks like you get Robbed for that kind of Money, for what should Probably be less than a $500.00 Fix at the Most with a Simple TSB they should have anyhow.
What I’ve found with our Local Dealers, anything over 10-15 years Old, they don’t want anything to do with it.
Anyhow, glad you’re up and Running again.
~Kevin~
Where do I find this TSB
There is a link to the TSB in the article.
Hi. I have a 2005 Fleetwood Southwind with almost the same problem:
Service soon light on
Code: VSS not working
Shifts at high revs
O/D light blinking.
Wondering if this TSB would work on 2005 F53?
The TSB applies mainly to 1999, 2000 and 2001 chassis.
The VSS fault your seeing may be a fouled sensor, as this is a common problem with all Fords in general. Look on the top of the differential. If the VSS sensor is located there, carefully remove it and replace it.
So glad I found this thread that also lead to the TSB. We just got our 2000 bounder 31w, and the right has been in the shop many times for the same p0720 code since almost new, many receipts and shop time but never fixed. The code popped on our way home right after we took ownership, and I’m now about to cut up the harness to redo these grounds.
Earlier this year, while researching the problem, I found a post from 2014 where a F53 owner performed the same fix and had good results. In that post, as well as this one, the main problem owners were having was erratic shifting. There were a few that mentioned stalling. I have not had any erratic shifting. My problem is the motorhome stalling when I drop it into drive or reverse. Have any other owners solved a stalling problem with this fix?
I’d try the TSB and see what happens..
Its solved a lot of unusual problems other than the shifting issue that it was released for.
John
Mine was like that, stalling on Drive, more on Reverse. After it was repaired 2 years ago, it started to do it again. I am still struggling with it. I’ll see that in next spring as it is stored at this time. The TSB really worked great except for a few problems recently.