Toe-in adjustment effects tire wear and handling. Unlike a car that has an adjustment on each wheel, the F53 chassis has one adjustment that points the front tires in (toe-in), or pushes them out (toe-out). Once this adjustment is made, the steering wheel may need to be re-centered.
If the front end is set with toe-out, this can make the motorhome handling squirrely, touchy and sensitive. This is really great if driving a race car, but it’s not the desired handling when trying to control a motorhome. When the adjustment moves past zero and goes to toe-in, this makes high speed more stable and less twitchy. More toe-in improves stability, but does effect tire wear. I’ve NEVER worn out a set of motor home tires, so I opt for a little more toe-in. Over the road (OTR) trucks have the toe-in set at zero or slightly toe-in to keep tire wear to an absolute minimum. If you have a truck place do your front end, talk to them about this.
Checking wheel toe angle doesn’t require any special tools or equipment. The measurements can be done with a straight edge and a tape measure, taking less than 15 minutes. If you decide to make an adjustment, this will take a little longer, but again, no special tools required.
You need to use great care when making your measurements to get them as accurate as possible, if you’re measuring on the tire, you’re looking for an measurement error of less than 1/16 of an inch. Always double, triple check your measurements.
F53 SPECIFICATION
Toe angle is typically specified as the angle between the two wheels, not one wheel and the center-line.
There are various sources for the F53 front end specifications, but the latest specs seems to be toe-in of 0.06 deg toe in, plus/minus 0.25 degree. With this spec, its possible to have a toe-out, and still be within specifications, but this will impact handling.
MEASUREMENT
The motorhome needs to be on a reasonably smooth level surface with the wheels pointed straight. The two front tires need to be the same make and model and their pressure needs to be equal. Although not absolutely required, to get the most accurate measurement, the motorhome should be loaded with its normal stuff and then driven forward onto the measuring spot ( not backwards).
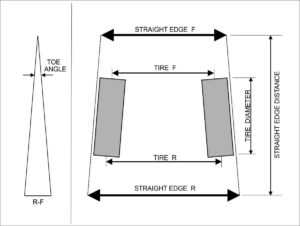
There are a couple different ways to make the measurements, both will provide acceptably accurate results: 1) Measured at tires, i.e. a fixed point on the tread of the tire , or 2) with a straight edge. The tire method will require a helper, the straight edge method can be performed by one person.
On older vehicles, the Specification is given in inches and there isn’t any need to convert this to an angle. The tire method will provide direct readings. If the spec is in degrees, either method will work, but will require a little math to convert the readings into an angle. If you’re not good at math, I added an angle “Calculator” near the bottom of this article.
I used a 4 ft long straight edge method and was able to do this by myself in about 10 minutes.
MEASURE TIRE METHOD
On the backside of each tire, at about the 8 o’clock / 4 o’clock position, use a pen, chalk, or something to place a mark on the tread i.e. in the center of the tire, in the center of the tread. I’ve hear of people using small straight pins stuck into the tire tread. This would probably provide the greatest accuracy, just make sure the pin doesn’t puncture a hole in the tire. Mark the pin location with a X to make it easier to see and find. The actual location of the pin on the tire isn’t critical, place on the tread near the outside to make it easier to measure with the tape.
With a helper, fish the measuring tape under the motorhome and pull it tight. Measure the distance between the marks on the backside of tires. This will be the back distance.
Start the motorhome, have your helper watch the marks you placed on the tire and slowly pull forward until the marks are now on the forward side of the tires at about the 4 (8) o’clock position. Measure the distance between the pins again, this the front distance.
Now measure the distance from the rear measurement point to the front measurement point. This will be the “Front to Rear” measurement.
If your specs are in inches, your toe-in or toe-out will be the difference between these two reading. A toe in of about 1/16 to 3/16 should be good.
If your specs are called out in degrees, take the measured difference between front and rear, multiply by 2, and that will be the approximate degrees. If you want a more exact number, enter the three measurements into the calculator below.
MEASURE STRAIGHT EDGE METHOD
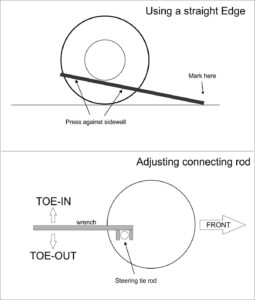
This is the method I used. I inspected the tire sidewalls to make sure there wasn’t any obvious bulges in the sidewalls of the tire. I then used a four foot long carpenters level (straight edge) placed against the sidewalls of the tire just below the rim. One end of the level was even with the edge of the tire and the other end rested on the ground in front (or behind) the tire.
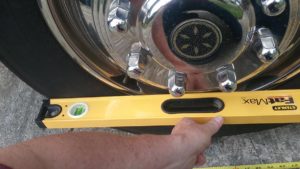
Placing the straight edge as high as it would go on the tire, I gently pressed the straight edge against the tire sidewalls and used a marker to place a line on the pavement where the straight edge was touching. I repeated this for both front wheels, placing marks on the pavement in front and behind the wheels.
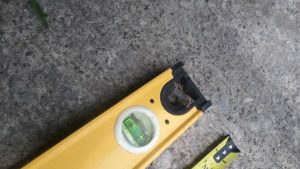
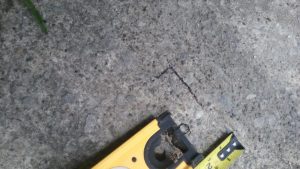
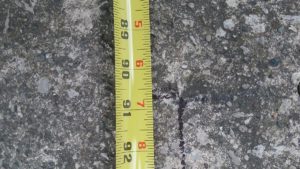
I then measured the distance between the front marks, the rear marks, AND then the distance between the front and rear marks.
If the front measurement is less than the rear, you have a toe-in condition. If the front is greater than the rear, you have a toe-out condition.
MAKING THE ADJUSTMENT
On my first measurement, I found my toe adjustment was at zero to slightly toe-out. I wanted to adjust it so it was a little toe-in.
My front end probably hasn’t been touched since it was new (1999). I loosened the tie rod clamps on both sides, but when I tried to turn the rod, it wouldn’t budge.
 To break the threaded rod ends loose from the rod, I heated the rod with a torch for a couple minutes. I then used two pipe wrenches, one on the threaded rod end and the other on the rod. With a little force, the threaded end started to turn. I repeated this on both sides.
Once I got both threaded rod ends loose, the rod rotated freely.
I place a mark on the rod as reference so I knew where my starting point was. From behind the axle, I then used a pipe wrench on the rod and turned it about 1/2 turn to give me more toe-in (turned wrench UP) . Note that turning the wrench UP will move the rod in a “toe-in” direction. moving the wrench down goes a “toe-out” direction.
After making several “adjustments” on the rod, I discovered the rod adjustment is very sensitive. One revolution of the rod seemed to give a little over one degree of toe adjustment. I was looking for about .25 degrees of toe-in.
REMEASURE and TEST DRIVE
I moved the motorhome back, then forward, then remeasured the toe. This time I got 90 5/8 (90.625 in) on the front and 91 (91.000 in) on the rear My Front and rear measurement marks were 64 inches apart.
When I entered these into the calculator, I came up with 0.336 deg toe in. This is a tiny bit past the max toe-in limit. It was very windy when I took it for short test drive, but it seemed like it improved the handling. I think I’ll leave it there and keep an eye on tire wear.
I had re-centered my steering wheel right after I bought the Southwind. After this adjustment, the steering wheel was now kind of turning right, so I re-centered the wheel again.
Are you saying to measure the marks made in front and behind each wheel then measure that? Wouldn’t that measurement depend on how the straight edge was placed on the ground.
I understand taking the front left to right measurement and then the rear left to right to compare.
Thank you for a great article
Yes, The front to rear measurement may be off an inch or so, but they should be close. Measure both sides and take the average.
have you ever considered doing a video for you tube? I will give all of your work some thought just to get my mind around it and than take a shoot at the adjustment.
Thankyou.. Yes, I always think about it.. After I’m finished… 🙂
Pingback: F53 Improve the handling – 1999 Southwind 35S
Pingback: HOW-TO Improve handling of F53 chassis - 1999 Southwind 35S
My steering wheel is way off center. How do I recenter it??
This is a real PITA……
Make sure to get a good front end alignment first, set toe-in to max or even a little past max.
Drive straight and mark the wheel so you know where its currently at.
When you get ready to make the adjustment, set the wheels straight, place the steering wheel at the mark. Use a strap (seat belt) or something so the wheel cannot be turned more than about 45 degrees. This will prevent the wheel from turning to much and damaging the clock spring.
There is a spline coupling shaft u-joint on top of the steering box. This needs to be removed, push the coupling up and off of the shaft. Align the wheel so its pointing straight, then push the shaft back on.
There is a TSB for this procedure:
http://1999southwind.com/DOWNLOAD/F53%20center%20steering%20wheel.pdf
Hi-I am planning to follow your alignment procedure and straighten the steering wheel. I also have a 1999 Southwind and in the TSB it says for 1999 to adjust by removing the wheel not at the steering gear. Any idea why they say this? Did you do it at the steering gear?
the problem with adjusting it by removing the steering wheel, it may not center the turn signal cancel. Mine was right on the edge and canceled the right turn with just a tine movement, but a lot of play for the left turn.
I originally centered with the steering wheel and the cancel was not centered.
I removed the wheel and recentered it so the cancel was centered. I then removed the u-joint at the gear box and recentered the wheel so it was centered.
Hope this makes sense.
John
Hi, The turn signal cancel was my concern as well. I’ll adjust it at the gear.
Thanks!!
Properly aligned wheels ensure your car handles properly, and therefore increases the life of your tyres and increases your safety.